
JP CE Modal Pro
Article Index
- JP CE Modal Pro
- How to install & use
- Add the new custom element
- Use content as Module
- Use content from section
- Popup Trigger Type
- Trigger Popup automatically
- Trigger Popup by click
- Trigger Popup using Custom HTML
- Trigger Popup during Scroll
- Trigger Popup from GRID like multi-items element link
- Popup Modal Close settings
- Important Configuration
- Video Tutorials
- Output
- All Pages
We trust that every element is great to expand the existing element list of Yootheme PRO and offers you a lot more design opportunities for your joomla sites. Our Modal Pro custom element is a super effective tool to load modules inside a modal. You can add it as a clickable button or an auto/onLoad type event (with cookie timing settings).
How to install & use:
- Download JP CE Modal PRO custom element latest version plugin from product page.

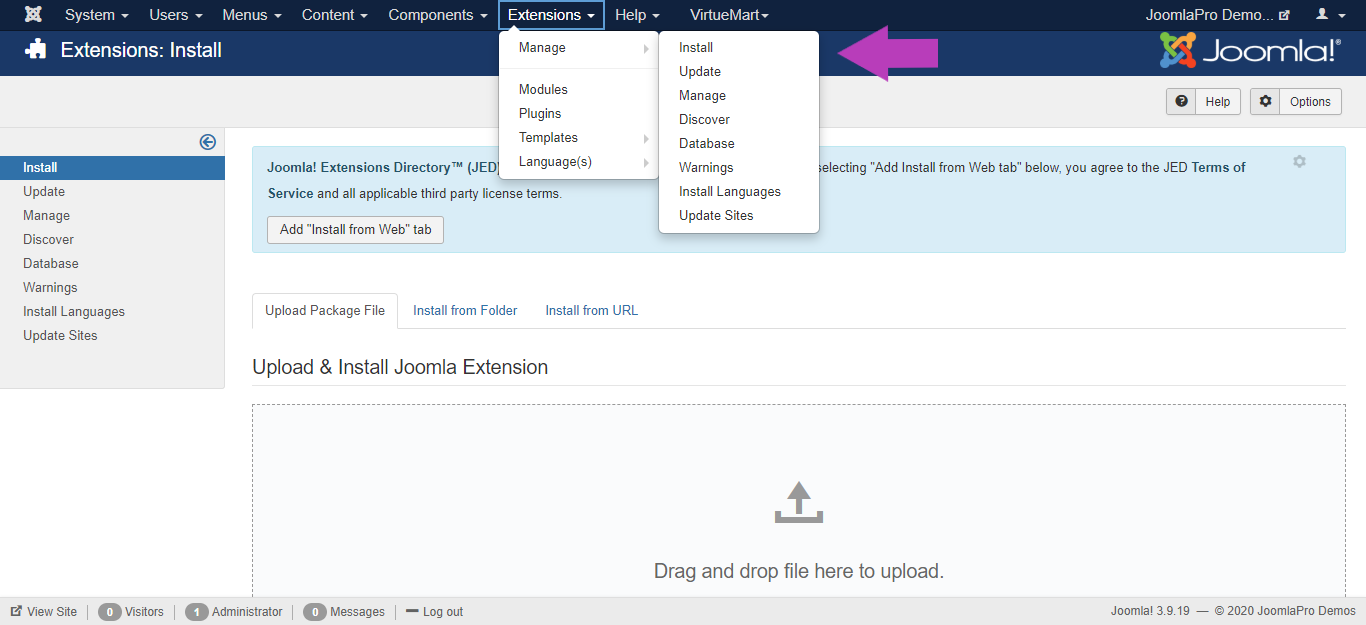
- You can just install the JP CE Modal PRO using the "Joomla Extension Manager", click “Extensions -> Manage -> Install”(like you install any other plugin extension for Joomla).
- Please make sure you load jQUERY via "YOOtheme -> Settings -> Advanced -> Load jQuery" under template settings.
- From the main joomla menu click “Extensions -> Plugins”. Use the Search or Filter feature to find the installed JP CE Modal PRO and then make sure the installed plugin is enabled.

r
- For wordpress go to WordPress admin area and visit Plugins -> Add New page. Then click on the ‘Upload Plugin’ button on top of the page and click on the ‘Choose File’ button select the downloaded plugin file
- After you have selected the file, you need to click on the ‘Install Now’ button. WordPress will now upload the plugin file from your computer and install it for you. You will see a success message after the installation is finished and then activate the plugin.


Add the new custom element:
- Now open "YOOtheme" website builder inside the Joomla admin and edit the page you want to add the installed "JP CE Modal PRO" custom element .
- Then you can easily add installed "JP CE Modal PRO" custom builder element in Yootheme PRO Website Builder.


- You can customise the settings for the element under "Content" tab in which how it will be displayed in your website.

Select the content type of the popup modal using "POPUP CONTENT TYPE" option. Here you have two options
- "Module" -> Select any of the different predefined list of modules.
- "Content" -> Define a new content in the editor which is used as a source for the popup modal.
- "Section" -> Displays the specified yootheme builder section id content.
"Module" option

- From the list of modules, select one module or widget in which its content will be used in the modal pop-up.

"Section" option

- Create a new section in the page with its content based on your requirements.

- Give a unique id to the section under advanced tab.

- Enter the unique section id created already in which its content will be used in the popup.

- Once finished all the settings for the element , Click "Save layout" and "Close" the website builder.
Select the event for the popup modal using "OPEN POPUP" option. Here you have two options
- "Auto" -> Triggerred the modal pop-up event automatically based on the additional related settings.
- "Click Button" -> Displayed a clickable button with the label .
- "Open on Scroll" -> Triggerred the modal pop-up event based on the defined scroll value of the page or when scroll reached the specified div id (supports joomla version only)
- "If Ad Block Enabled" -> Triggerred modal pop-up when AD-block enabled.
- "Timer" -> Triggerred modal pop-up repeatedly on specified time interval without refershing the page.
"Auto" option

Find the additional auto settings to schedule modal popup easily.
- "REPEAT POPUP" -> Specifies the cookie time interval to show popup again automatically.
Use the various options based on your site requirements.
- "Always" -> Triggers the modal popup everytime the user visits the webpage.
- "First Time Only" -> Triggers the modal popup when the user visits the webpage first time. This is used for new user registration offers.
- "After 30 mins" -> Triggers the modal popup when the user visits the webpage after 30 mins.
- so on.....

- Once finished all the settings for the element , Click "Save layout" .
"Click Button" option

Find the additional button settings for designing your page easily.
- "BUTTON TYPE" -> Specifies the type of the button "Automatic" or "Custom HTML".
- If you select "Automatic" then below options are available for button styling.
- "BUTTON TEXT" -> Specifies the value or label for the button.
- "BUTTON SIZE" -> Specifies the size of the button.
- "BUTTON STYLE" -> Specifies the style of the button.
- "BUTTON ALIGNMENT" -> Specifies the different location or alignment of the button to be displayed.

Use these various options based on your site customizations.

"Custom HTML" option
- If you select "Custom HTML" then field "Modal ID(Unique ID)" displayed to enter the unique id for the modal using this you can use trigger the modal pop-up content in any of that builder page.
- For example, <a href="#modal_link_1" class="uk-text-success" uk-toggle>Test Modal Link</a> here used modal popup as a link to the text in the page, where "modal_link_1" is unique id defined in "Modal ID(Unique ID)" field.

- Once finished all the settings for the element , Click "Save layout" and "Close" the website builder.
"Open on Scroll" option

Find the various settings below.
- "Scroll from top value" -> Modal popup content triggers when the user reaches the defined "Scroll value" of the page.
- "Scroll value" -> Value of the page in which the modal triggers.
- "Scroll to div" -> Modal popup content triggers when the user reaches the defined "div id" of the page.
- "Scroll div id" -> Div id of the page in which the modal triggers.
Use these various options based on your site customizations.

- Once finished all the settings for the element , Click "Save layout" and "Close" the website builder.
"Use from GRID like multi-items element link"
- If you want to open the modal popup from GRID like multi-items element link just follow these steps. This will also work with Gallery and other elements.
- Open the element item and fill the link field with unique id of the modal in which you want to link.

- Then give a unique id to the grid element.

- Add the below script to the custom code section of the builder, where 'test_modal123' is the grid element ID created before replace this with your element unique ID.
jQuery(document).ready(function() { var elements = jQuery('#test_modal123 a') elements.removeAttr('uk-scroll') elements.attr('uk-toggle', '') });

- Once finished all the settings, Click "Save" and "Close" the builder.
Popup Modal Close settings
- Open "YOOtheme" website builder inside the Joomla admin and then click "JP CE MODAL PRO" element "Settings".

- "Show close outside the modal" -> Show the close icon outside the modal popup by default it is inside the modal.
- "Background Click - Close Modal" -> Close the modal popup when user clicks outside the modal.
- "Esc Click - Close Modal" -> Close the modal popup when user press the "ESC" key

Important Configuration
- If you faced any problem during module or section content loading issue then check the below settings
- Open "YOOtheme" website builder inside the Joomla admin and then select "Settings -> Advanced".


- Make sure "Load jQuery" option is enabled.

Video Tutorials
Have a look of "JP CE Modal PRO" output.


