PCuikit
Article Index
- PCuikit
- How to install
- Getting Started
- Custom Product
- Custom Categories
- Custom Products
- Phoca Cart Category View
- Phoca Cart Category Products List
- Product Details View
- PCuikit Component
- Custom Elements
- PC Addtocart
- PC Category
- PC Category Grid
- PC Grid
- PC Product
- PC Product Grid
- PC Product Images
- PC Utilities
- PCuikit - One Page Checkout plugin
- PC Order Thank You Page template
- All Pages
PCuikit - A unique package allows you to load phoca cart content into your website layouts and create site-wide templates with the following views using the YOOtheme Pro page builder and dynamic content.
- Category view
- Product Details view
- Checkout Layout
- User Account view
If you are here you probably are and have been using YOOthemes Builder and the quite new Dynamic Content features available. With PCuikit we have implemented full support for this. This open incredible new doors for web designers and agencies to freely create templates for Phoca cart.
How to install:
PCuikit supports YOOtheme PRO page builder / UIkit 3 templates
- Download the latest “pcuikit_package_0.x.x” from “PCuikit” product page.


- You can just install the plugin using the "Joomla Extension Manager", click “System -> Extensions ” and then upload the zip file to install the extension.

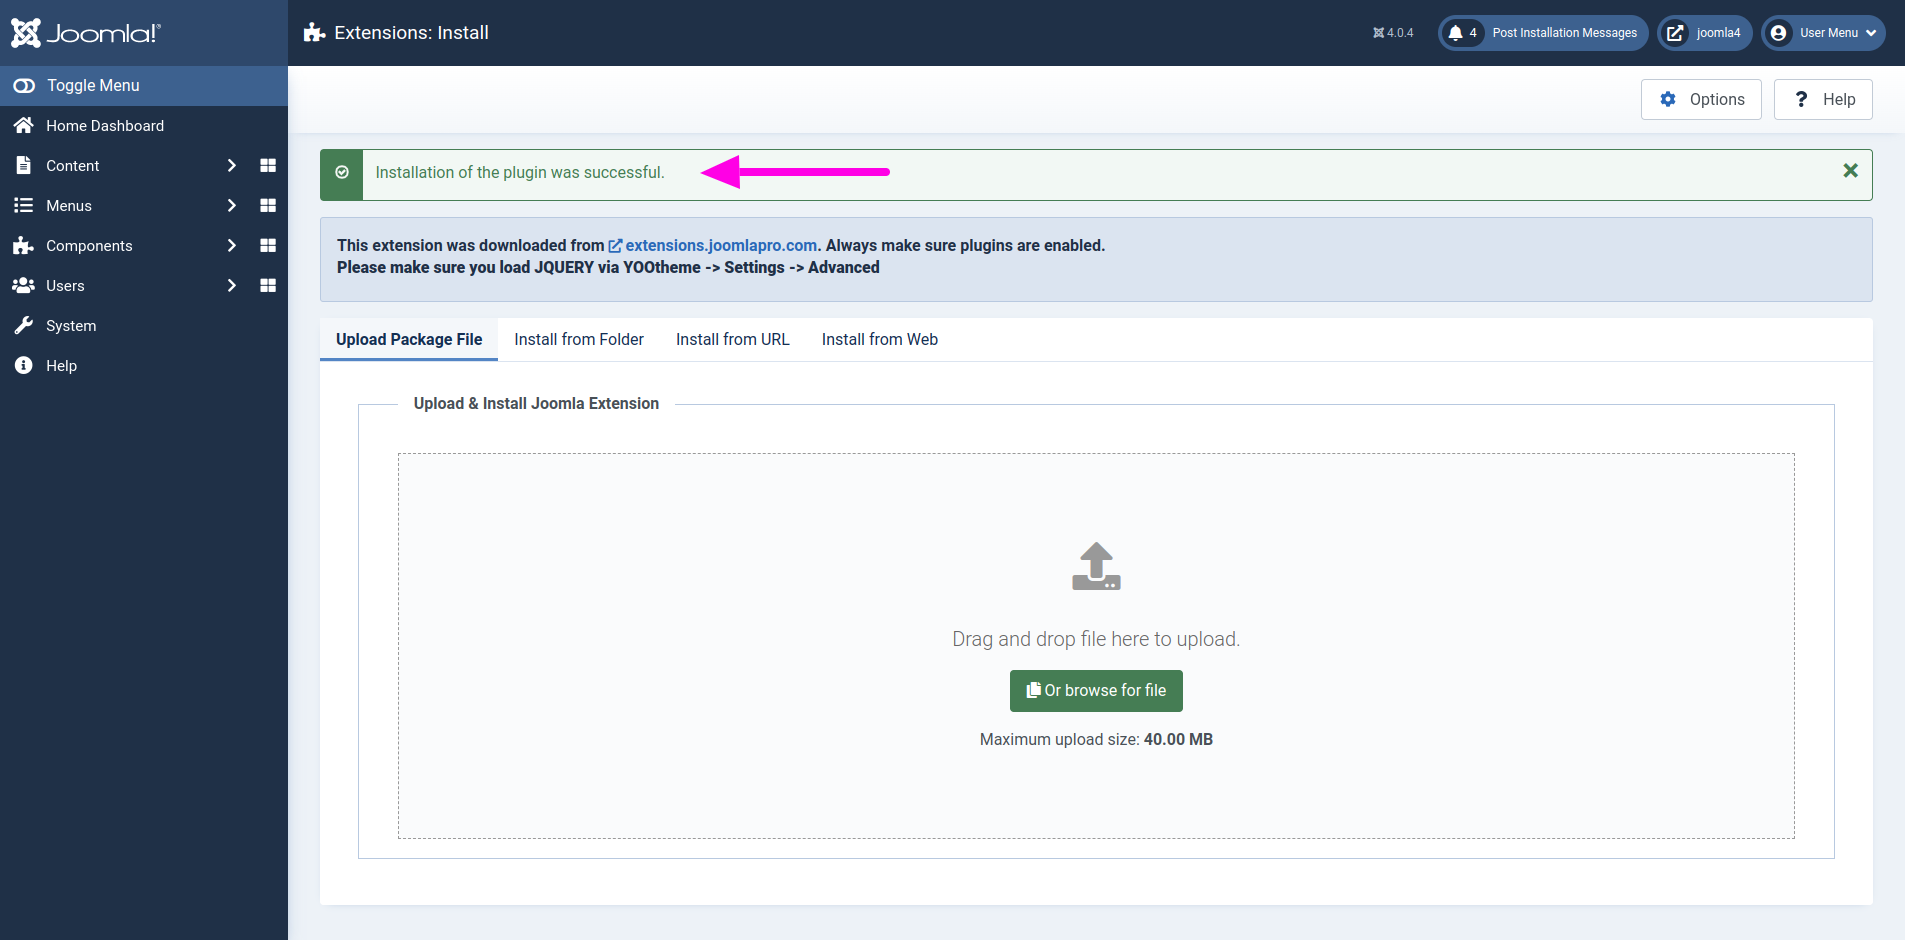
- From the main joomla dashboard click “System -> Manage -> Extensions”. Use the Search or Filter feature to find the installed pcuikit plugin and then make sure the installed plugin is enabled.

Recommended Phoca configurations for PCuikit :
- Open the Phoca Cart Configuration from “Components → Phoca Cart → Control Panel → Options” OR "System → Global Configuration → Phoca Cart"


- Then go to the “Display” tab and set the theme as "UIkit" , Icon Type as "SVG" , Load Main CSS as "No" under "Theme Options"

- Set "Interactive Change (Price)" as "Yes" under "General Display Options" which allows for dynamic updates of the product price based on selected attributes.

- Set "Add to Cart Method" as "Ajax with popup window" under "Ajax Options"

- Then go to “Users” tab and enable "Guest Checkout" option

Custom Product :
- Open "YOOtheme" website builder inside the Joomla admin and edit the page you want to add the elements with simple custom product using dynamic content.
- Select the preferred builder elements from Yootheme PRO Website Builder elements list with the row settings as Halves.

- Add the elements to the section here we used "Image","Heading","Text","HTML" elements.
- Click "Advanced" menu in the image element and then select the option "Custom Product" from "DYNAMIC CONTENT" and select the product you want to show from "Select Product".

- Once a PC content source is selected, its fields are available for mapping.
- To map a content field to an element's field, open the Content tab of an element. Each element field shows a Dynamic button on the right which opens a dropdown with a list of all available content fields.
- Select the content field to map it to the element's field. For example, you can map the image field to product image , image alt field to the selected product image alt and link field to the selected product link.

- Once finished all the settings for the element , Click "Save layout" and "Close" the website builder.
- Repeat the same "Advanced" menu settings described above for Heading element.
- Select the content field to map it to the element's field. For example, you can map the content field of the product name.

- Repeat the same "Advanced" menu settings described above for Text element.
- Select the content field to map it to the element's field. For example, you can map the content field of the product description .

- Repeat the same "Advanced" menu settings described above for HTML element.
- Select the content field to map it to the element's field. For example, you can map the content field of product add-to-cart.

Custom Categories :
- Now open "YOOtheme" website builder inside the Joomla admin and edit the page you want to add the elements with dynamic content.
- Then you can easily select the preferred builder elements from Yootheme PRO Website Builder elements list.

- Click on the selected element here we used "GRID" element .

- Then click "ADD ITEM" to add the new item to the element.

- Click "Advanced" menu in the new item and then select the option from "DYNAMIC CONTENT".

- Select a predefined content source to make its fields available for mapping. Here for example "Custom Products" and simultaneously select the related options below for the selected content source.
- "PARENT CATEGORY" - Listed the available categories in the store, if you want to list all categories select "Root" option or to list all sub-categories of parent category select the specific parent category.

- Once a content source is selected, its fields are available for mapping.
- To map a content field to an element's field, open the Content tab of an element. Each element field shows a Dynamic button on the right which opens a dropdown with a list of all available content fields.

- Select the content field to map it to the element's field. For example, you can map the title and image to the name and image fields of the selected product category .

- Once finished all the settings for the element , Click "Save layout" and "Close" the website builder.

Custom Products :
- Now open "YOOtheme" website builder inside the Joomla admin and edit the page you want to add the elements with dynamic content.
- Then you can easily select the preferred builder elements from Yootheme PRO Website Builder elements list.

- Click on the selected element here we used "PC GRID" element .

- Then click "ADD ITEM" to add the new item to the element.

- Click "Advanced" menu in the new item and then select the option from "DYNAMIC CONTENT".

- Select a predefined content source to make its fields available for mapping. Here for example "Custom Products" and simultaneously select the related options below for the selected content source.
- "FILTER BY CATEGORIES" - Listed the available categories in the store.
- "FILTER BY TAGS" - Filter products by tags.
- "FILTER BY MANUFACTURERS" - Filter products by Manufacturer.
- "FILTER BY FEATURED PRODUCTS" - Filter by featured products.

- Once a content source is selected, its fields are available for mapping.
- To map a content field to an element's field, open the Content tab of an element. Each element field shows a Dynamic button on the right which opens a dropdown with a list of all available content fields.

- Select the content field to map it to the element's field. For example, you can map the title and image to the name and image fields of the selected product category .

- Once finished all the settings for the element , Click "Save layout" and "Close" the website builder.

Phoca Cart Category View
- To use the phoca cart category view create the page in Main Menu and select the Categories View (Category list layout - default view) as Menu Item Type.

- Open "YOOtheme" website builder inside the Joomla admin and go to the page newly created and the in-built layout template was applied to the page with builder elements using dynamic content.

- Click on the Yootheme PRO "Templates" and then click "Phoca Cart Categories" template.


- Here you found the predefined phoca categories template layout using yootheme elements with dynamic content sources.

- Click on the grid element and click "PC Categories" item then go to "Advanced" menu in the element.
- Select the option "PC Categories" from "DYNAMIC CONTENT" dropdown list.

- Once a dynamic content source is selected, its fields are available for mapping.
- To map a content field to an element's field, open the Content tab of an element. Each element field shows a Dynamic button on the right which opens a dropdown with a list of all available content fields.
- Select the content field to map it to the element's field. For example, you can map the title field to category title.

- Repeat the same and check the settings for other elements used in template.
Phoca Cart Products List
- Open "YOOtheme" website builder inside the Joomla admin and go to the categories List page and then select any of the category, products list template was applied to the page with builder elements using dynamic content.

- Click on the Yootheme PRO "Templates" and then click "Phoca Cart Category" template.


- Here you found the predefined phoca category products list using yootheme elements with dynamic content sources.

- Click on the PC Grid element and click "PC Category Products" item then go to "Advanced" menu in the element.
- Select the option "PC Category Products" from "DYNAMIC CONTENT" dropdown list.

- Once a dynamic content source is selected, its fields are available for mapping.
- To map a content field to an element's field, open the Content tab of an element. Each element field shows a Dynamic button on the right which opens a dropdown with a list of all available content fields.
- Select the content field to map it to the element's field. For example, you can map the title field to product name.

- Repeat the same and check the settings for other elements used in template.
Product Details View
- Open "YOOtheme" website builder inside the Joomla admin and go to the product details page, in-built layout template was applied to the page with builder elements using dynamic content.

- Click on the Yootheme PRO "Templates" and then click "Phoca Cart Product" template.


- Here you found the predefined product details template layout using yootheme elements with dynamic content sources.

- Here we used PC Product Images custom element for product gallery and then the set various options the element as per your requirements. Third party gallery style supports slideshow, zoom, mutiple image view.
- You can also use YOOtheme default style also

- In Heading element, select the content field to map it to the element's field. For example, you can map the content field to the selected product price (html) and click the edit icon of the field to change the options of which price to be displayed as per your requirements.

- If you want to hide any of the price value with empty or zero value, you can use "Hide price if empty" option.

- In HTML element, select the content field to map it to the element's field. For example, you can map the content field to "Add to cart" click the edit icon of the field to set the custom style options.

- Repeat the same and check the settings for other elements used in template.
- If Minimum Order Quantity is set then the quantity fields restricts the user at the specified value and also if Minimum Multiple Order Quantity is set then the -/+ button multiples that value only.

PCuikit Component :
PCuikit Component comes with the simple configuration supporting Phoca Cart cart module settings and quick links for Renew Subscription, Documentation/FAQ, Support portal. Also have a list of latest change logs for easy new feature refernces.
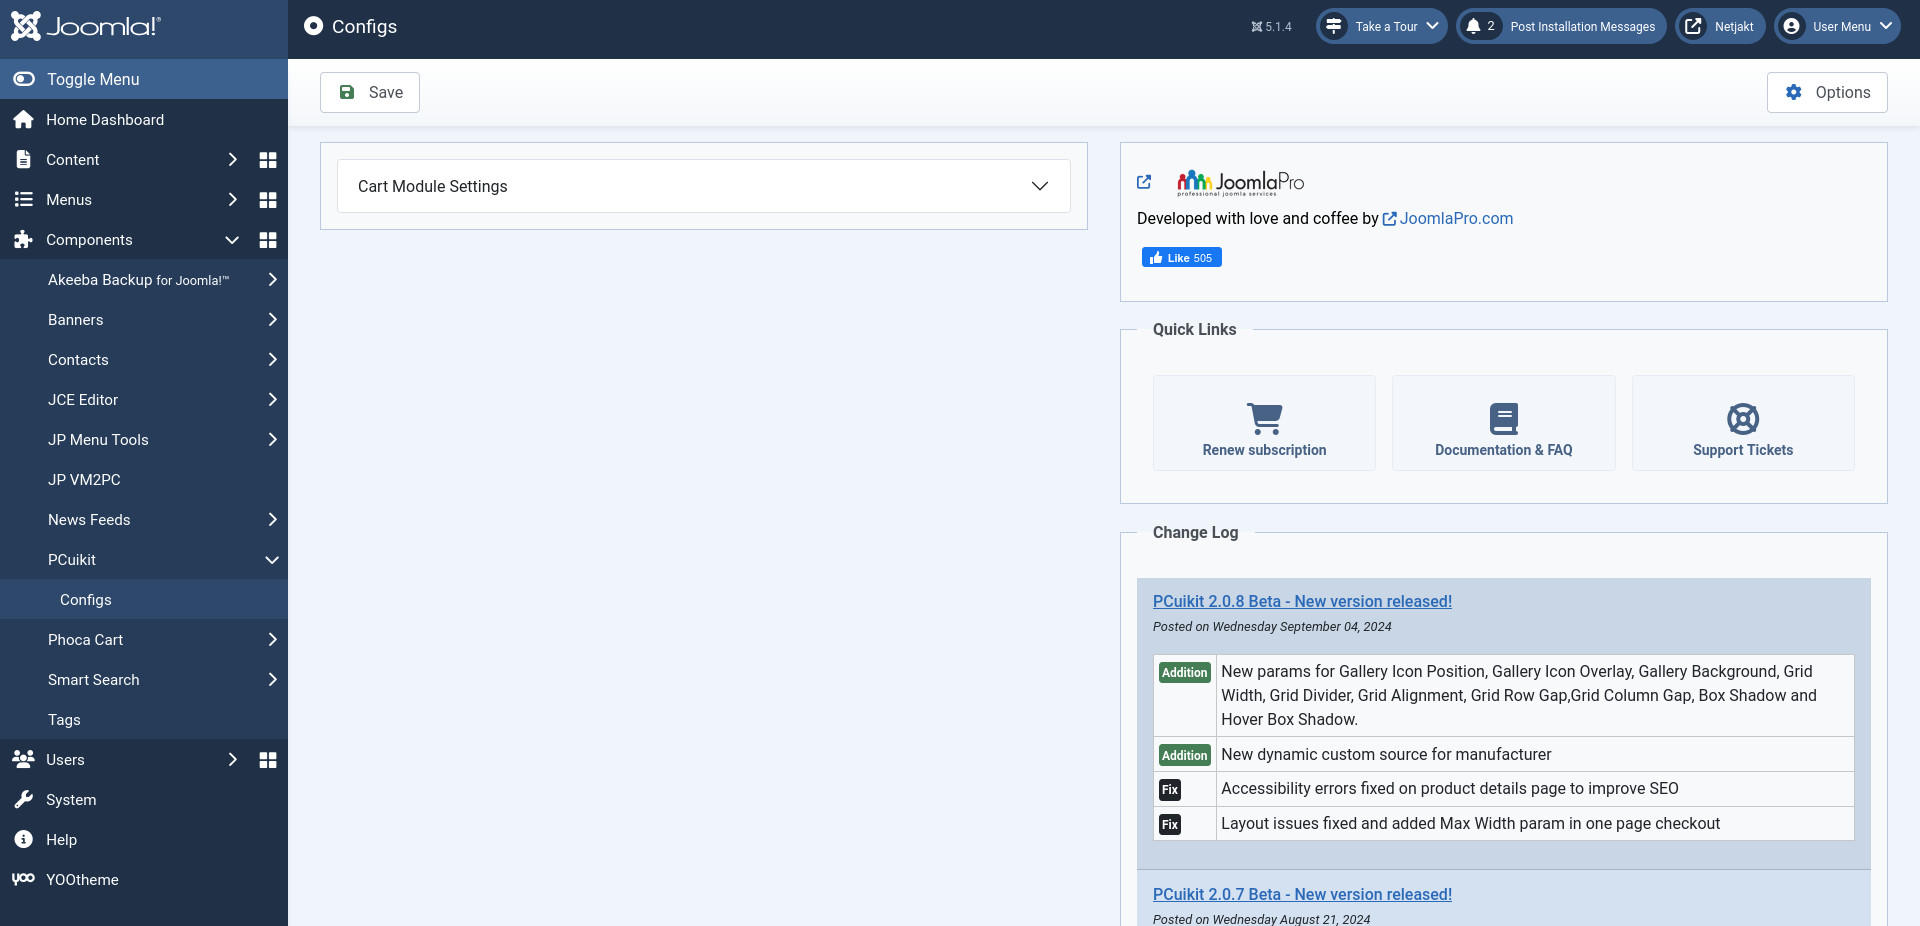
- If you use the Phoca Cart shopping cart module then these settings are helpful to design its layout and alignment things in a effective ways.

- Set the empty cart module settings for both desktop and mobile layouts.
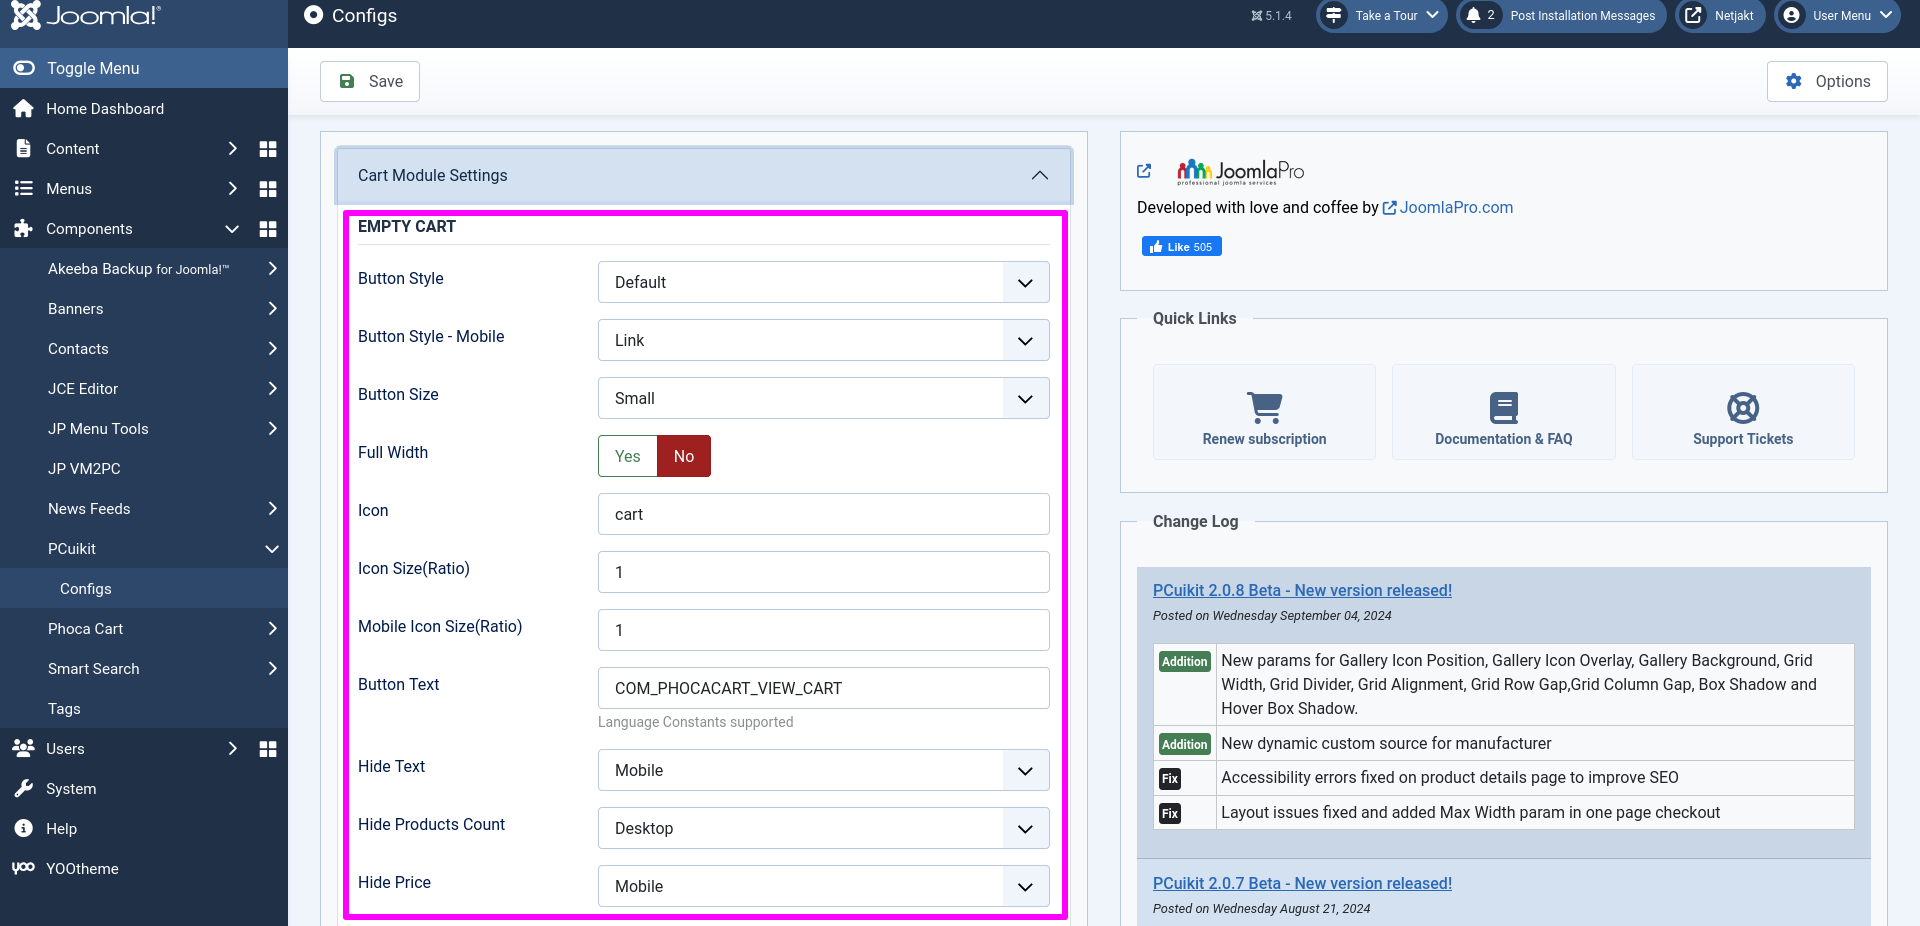
- Button Style -> Sets the style of the button in desktop view
- Button Style - Mobile -> Sets the style of the button in mobile view


- Hide Text -> This will hide the text in the selected device layout.
- Hide Products Count -> This setting is used to hide the product count in the cart.
- Hide Price -> Used to hide the price in the selected device layout.

- Like the above, here one can set the cart module settings with products added for both desktop and mobile layouts.
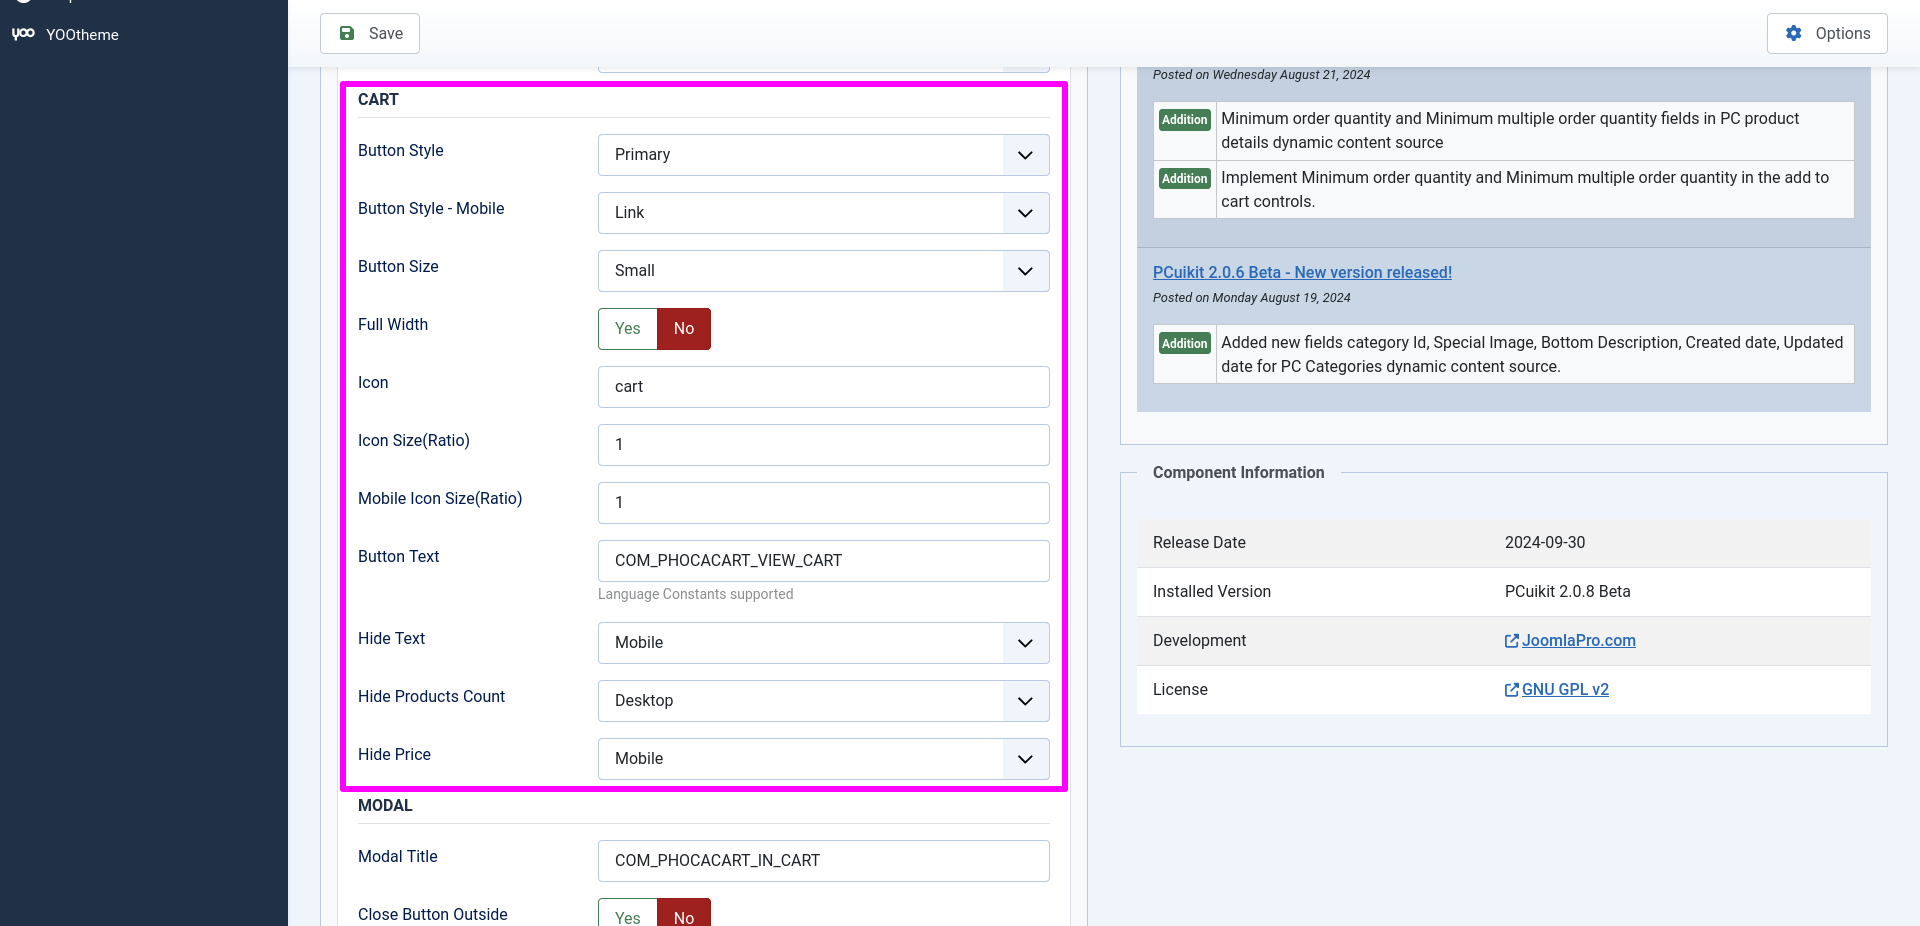
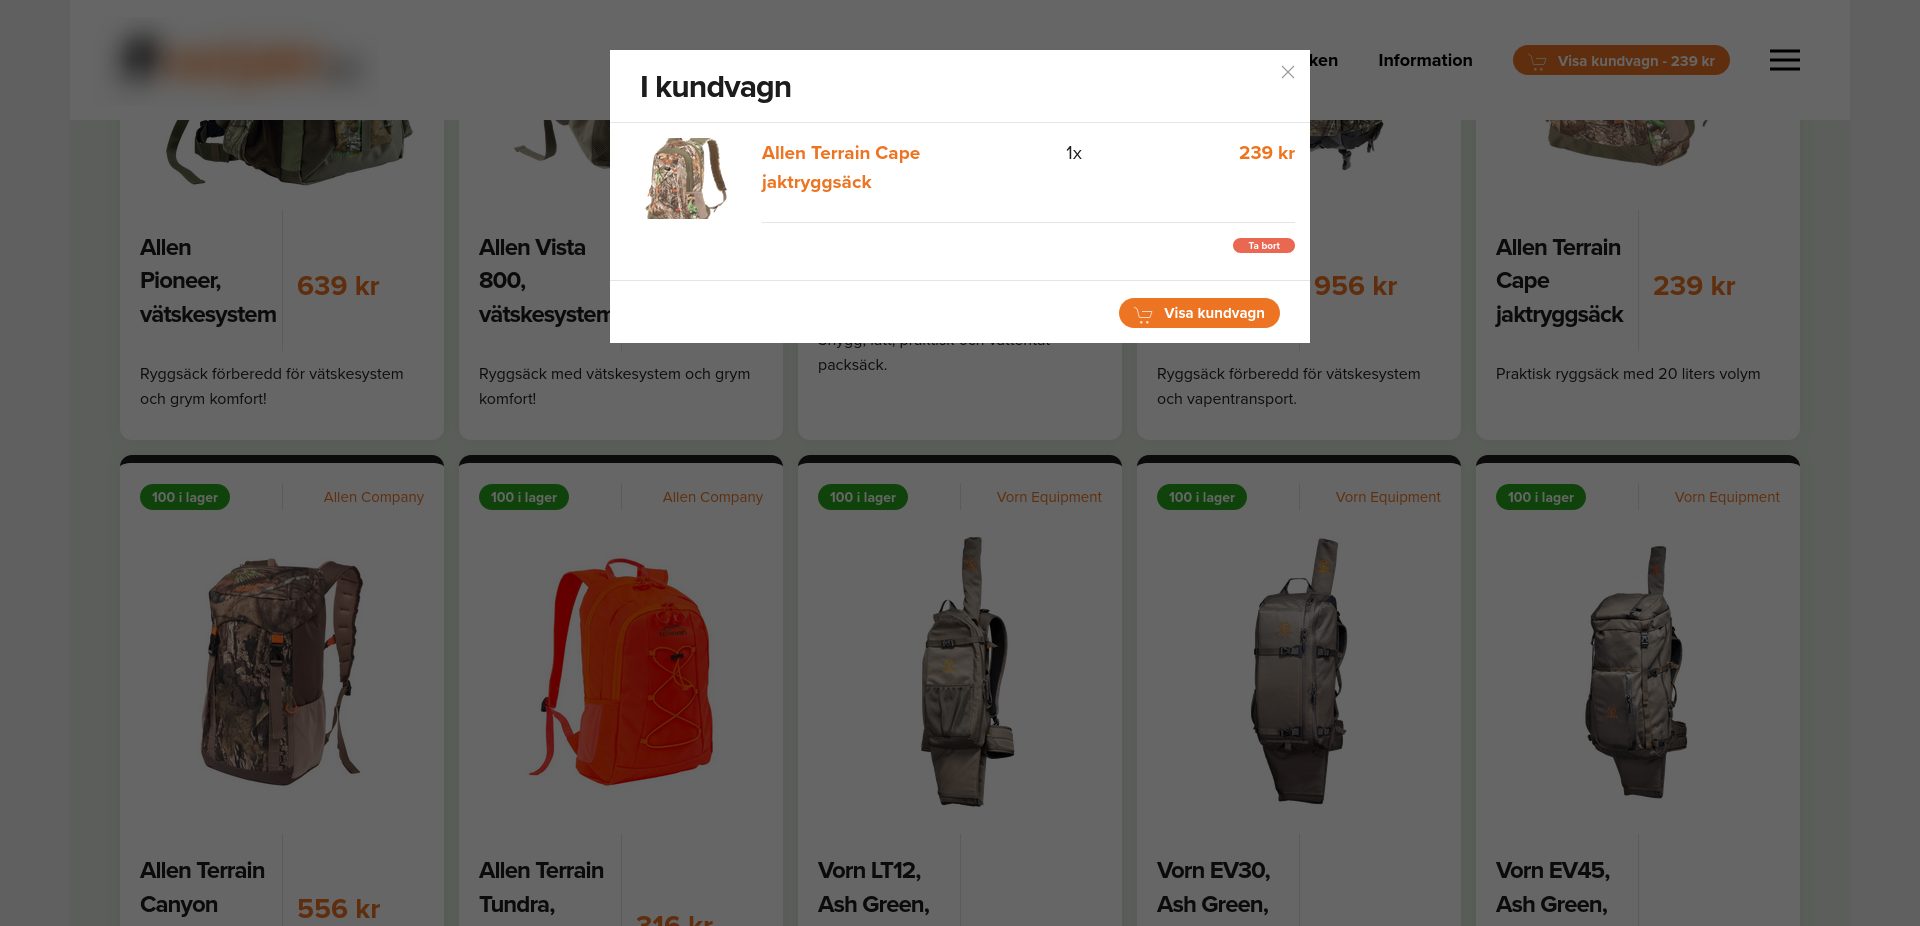
- Modal settings are used to set the cart modal layout - display Style and button style of the modal cart

Custom Elements
PCuikit comes with additional custom elements for YOOtheme Pro Builder. These new elements makes it easy to use Add to cart' buttons, products and categories directly in your YOOtheme Pro layout. This lets to easily create awesome custom product pages with Add to cart buttons etc.
- PCuikit YOOtheme Pro Builder Custom Elements are now installed along with the PCuikit package installation smartly and added to the builder for instant usage without any additional installations.
PC Addtocart Custom Element :
- Open your site "YOOtheme" website builder inside the Joomla admin and edit the page section in which you want to add the "PC ADDTOCART" custom element.
- Then you can easily add listed PCuikit custom builder element PC Category from the list of PCuikit custom elements.


- Add PC ADDTOCART and customise the settings for the element under "Settings" tab in which how it will be displayed in your website.

- Once finished all the settings for the element , Click "Save layout" and "Close" the website builder.

PC Category Custom Element :
- Open your site "YOOtheme" website builder inside the Joomla admin and edit the page section in which you want to add the "PC Category" custom element.
- Then you can easily add listed PCuikit custom builder element PC Category from the list of PCuikit custom elements.


- You can select the Phoca Category under "Content" tab and customise the settings for the element under "Settings" tab in which it will be displayed in your website.


- Once finished all the settings for the element , Click "Save layout" and "Close" the website builder.

PC Category Grid Custom Element :
- Open your site "YOOtheme" website builder inside the Joomla admin and edit the page section in which you want to add the "PC Category Grid" custom element.
- Then you can easily add listed PCuikit custom builder element PC Category Grid from the list of PCuikit custom elements.

- Now you can add the PC Category from the "Add Item" option and select one from the list of categories.


- Repeat the same for adding more categories to the grid item.

- You can change the settings for the element under "Settings" tab in which how it will be displayed in your website.

- Once finished all the settings for the element , Click "Save layout" and "Close" the website builder.
PC Grid Custom Element :
- Open your site "YOOtheme" website builder inside the Joomla admin and edit the page section in which you want to add the "PC Grid" custom element.
- Then you can easily add listed PCuikit custom builder element PC Grid from the list of PCuikit custom elements.

- You can add the PC Grid and customise the settings for the element under "Content" tab .
- Now use the "Add Item" option and then select "Custom Products" as Dynamic Content in "Advanced" tab.


- Once a content source is selected, its fields are available for mapping.
- To map a content field to an element's field, open the Content tab of an element. Each element field shows a Dynamic button on the right which opens a dropdown with a list of all available content fields.

- Select the content field to map it to the element's field. For example, you can map the title and image to the name and image fields of the product.

- Once finished all the settings for the element , Click "Save layout" and "Close" the website builder.
PC Product Custom Element :
- Open your site "YOOtheme" website builder inside the Joomla admin and edit the page section in which you want to add the "PC Product" custom element.
- Then you can easily add listed PCuikit custom builder element PC Product from the list of PCuikit custom elements.

- You can add the PC Product and select the product from the list of Phoca Product.
- customise the settings for the element under "Settings" tab in which the selected product will be displayed in your website.


- Once finished all the settings for the element , Click "Save layout" and "Close" the website builder.

PC Product Grid Custom Element :
- Open your site "YOOtheme" website builder inside the Joomla admin and edit the page section in which you want to add the "PC Product Grid" custom element.
- Then you can easily add listed PCuikit custom builder element PC Product Grid from the list of PCuikit custom elements.

- Now you can add the PC Products list from the "Add Item" option and select one from the list of your PC store products.


- Repeat the same for adding more products to the grid item.

- You can change the settings for the element under "Settings" tab in which how it will be displayed in your website.

- Once finished all the settings for the element , Click "Save layout" and "Close" the website builder.

PC Product Images Custom Element :
- Open your site "YOOtheme" website builder inside the Joomla admin and edit the product details page in which you want to add the "PC Product Images" custom element.
- Then you can easily add listed PCuikit custom builder element "PC Product Images" from the list of PCuikit custom elements.

- You can display the product images as a gallery.
- Customise the settings for the element under "Settings" tab.

- If "Gallery Style" is set as "Third party" which supports Gallery View and Zoom.

- If "Gallery View" is set as "Yes" then Gallery View settings listed.
- Gallery Icon Position - Set the position of the gallery icon in the main product image
- Gallery Icon Overlay - Set the overlay for gallery icon
- Gallery Background - Set the background color for gallery view

- If "Zoom" is set as "Yes" then Zoom Type setting listed which is used to set the type of the action to start the zoom.

- Thumbnav Settings allows to set the various options for thumbnav like column settings, alignment, divider, row gap, column gap, shadow.

- If "Gallery Style" is set as "Yootheme Default" which supports different slideshow settings, lightbox and thumbnail gallery view.

- "Slideshow Animation" settings allows to set different transition effect, auto play options, parallax and ken burns effect.

- "Slideshow Navigation" settings are used to set navigation type and thmbnail image width/height.

- "Slideshow Slidenav" settings are used to set slidenav style and position.

- Once finished all the settings for the element , Click "Save layout" and "Close" the website builder.

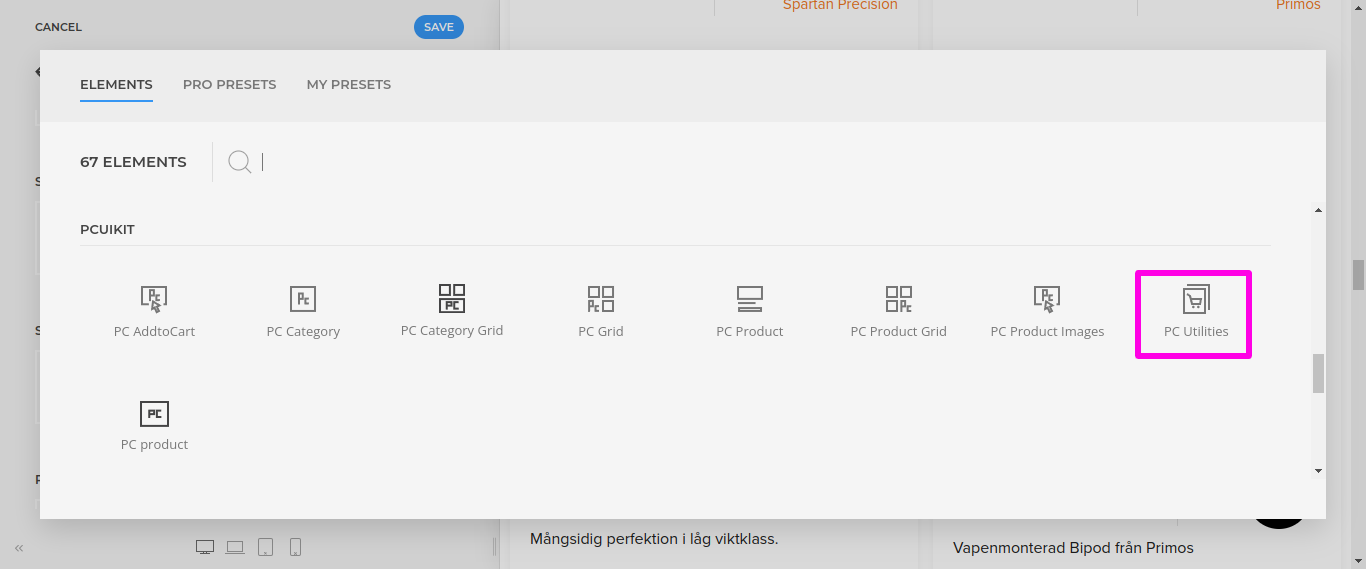
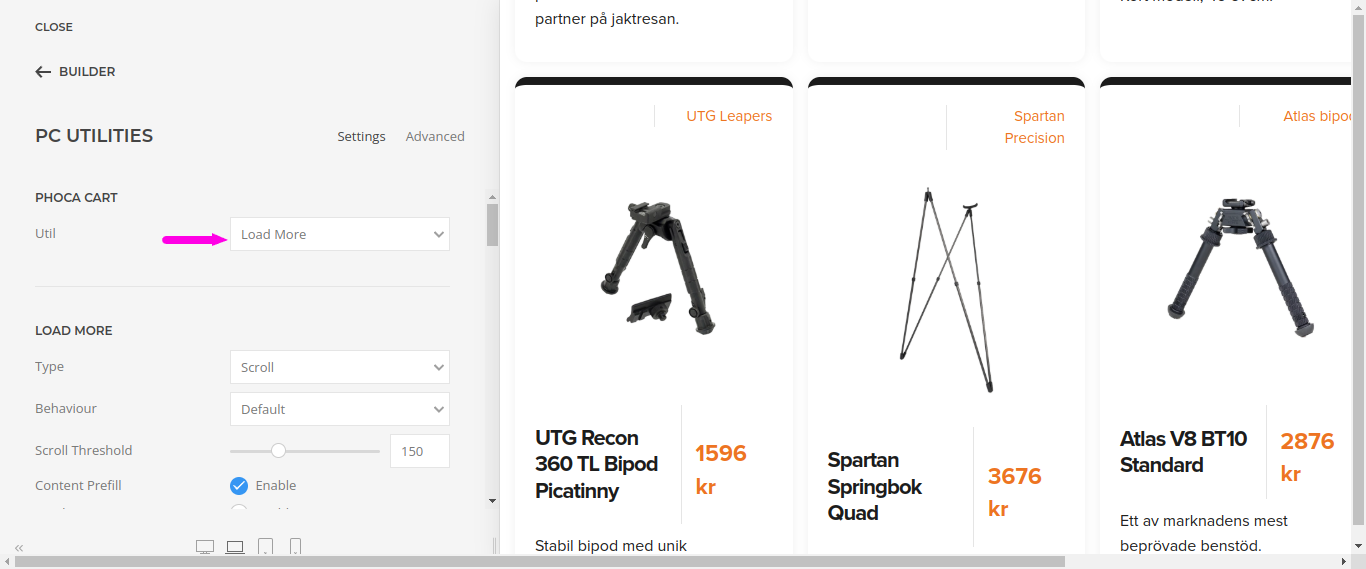
PC Utilities Custom Element
- Open your site "YOOtheme website builder" inside the Joomla admin and edit the category page section in which you want to add the "PC Utilities" custom element.
- Then you can easily add PC Utilities element from the list of PCuikit custom elements.
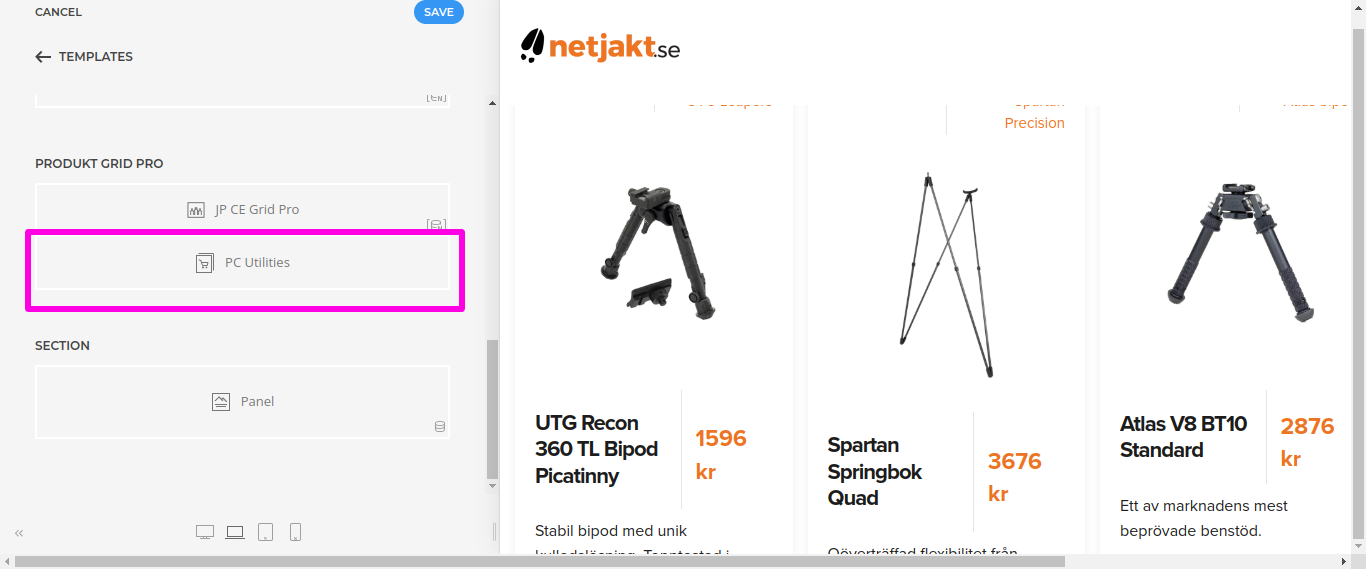
- You can select the "Load More" from the "Util" option.
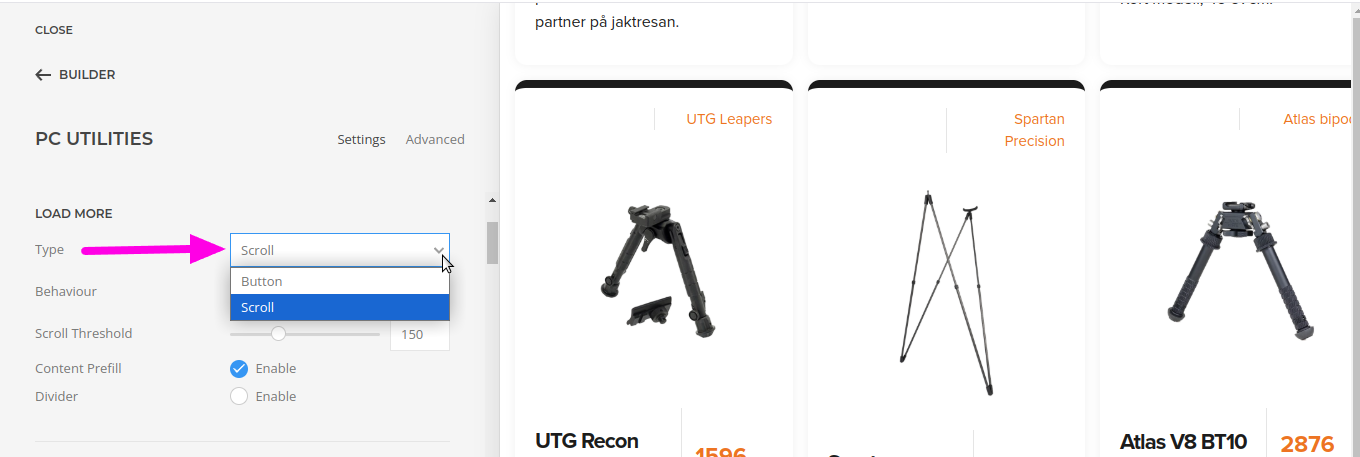
- You can change the Load More settings type of the element "Button" or "Scroll" in which how it will be displayed in your website.

- If you select the Load More settings type of the element as "Scroll" then scroll behaviour , threshold and spinner options are unlocked.
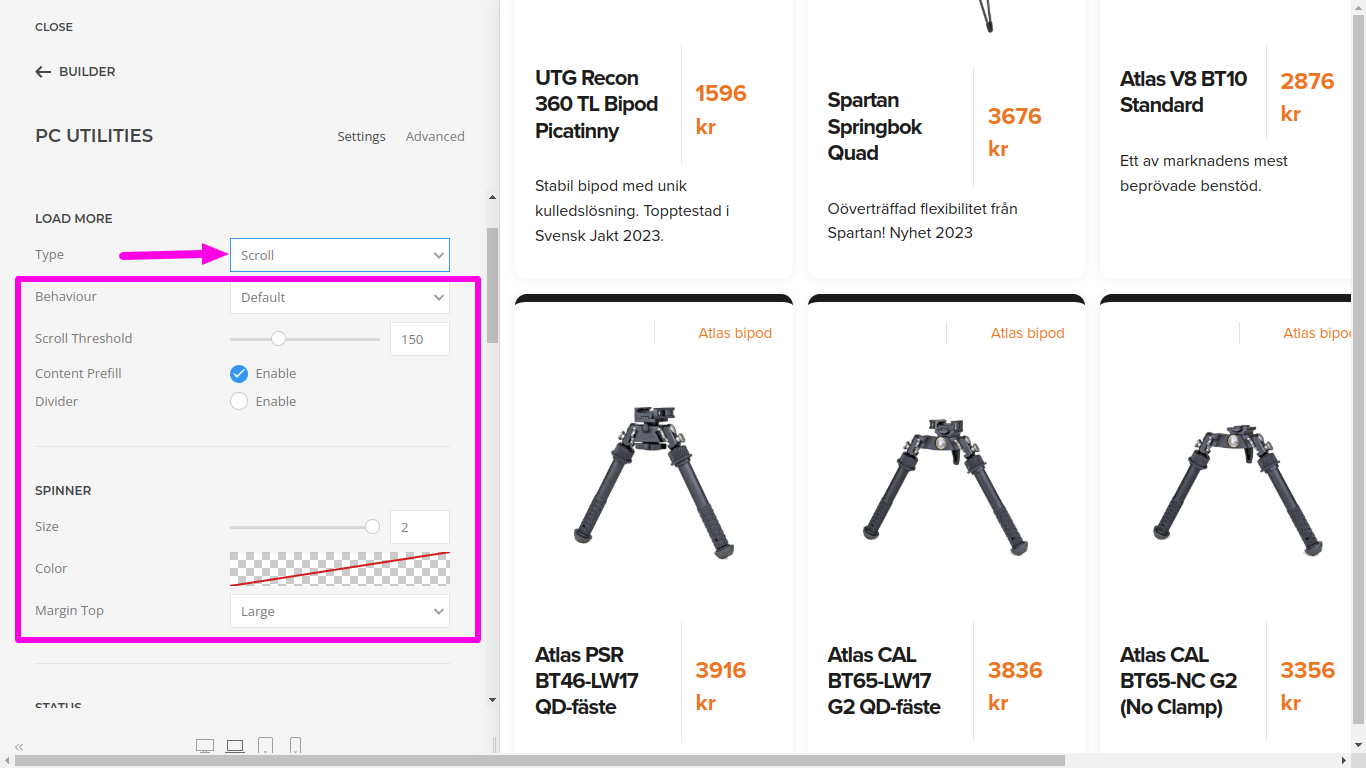
- Additionally you can set the status and button settings of the element as per your requirements.

- Once finished all the settings for the element , Click "Save layout" and "Close" the website builder.
One Page Checkout Plugin :
- From the PCuikit component you can access the below One Page Checkout Settings page from the main joomla menu click “Extensions -> Plugins”. Use the Search or Filter feature to find the installed "PCuikit One Page Checkout", and then click on the plugin.
- PCuikit installation by default enables PCuikit One Page Checkout Plugin.
- If you want to use default layout for cart page then please disable PCuikit One Page Checkout plugin.

- PCuikit One Page Checkout plugin has various layout configuration options to meet your exact need of the cart page. Proceed to the configuration one by one and click "Save&Close" to save the settings.

- If you want to use Hide Country and Hide State options then you should fill the default country and city ID in the Phoca cart Form Fields settings


- You can customize the text in the One Page Checkout from "Text & Languages" tab. Joomla constants also can be used in these text areas and input fields.

- Customize the confirmation/Thank you page from "Thank you" tab with your own messages.

.

- At the front end, visit the cart page and all things displayed on one page for checkout. Customers fill full information with Bill to address, Ship to address, shipping method, Payment method and coupons(if any). Finish with one click on ''Confirm Order'' button.

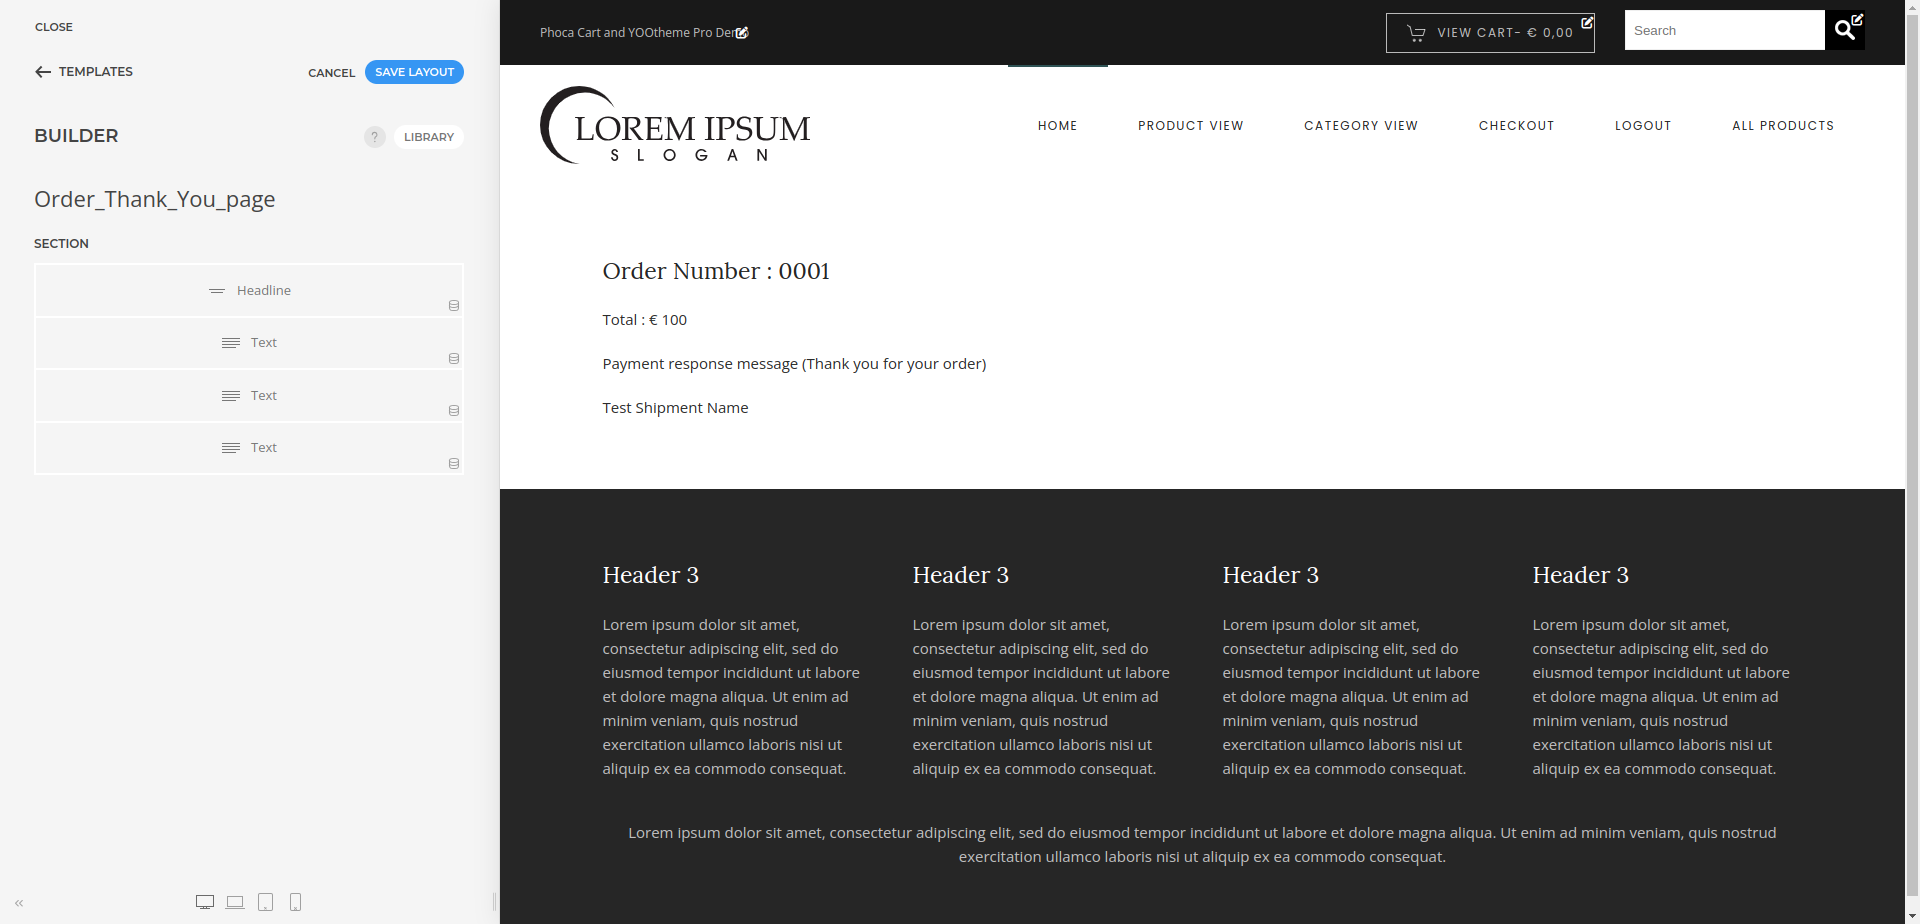
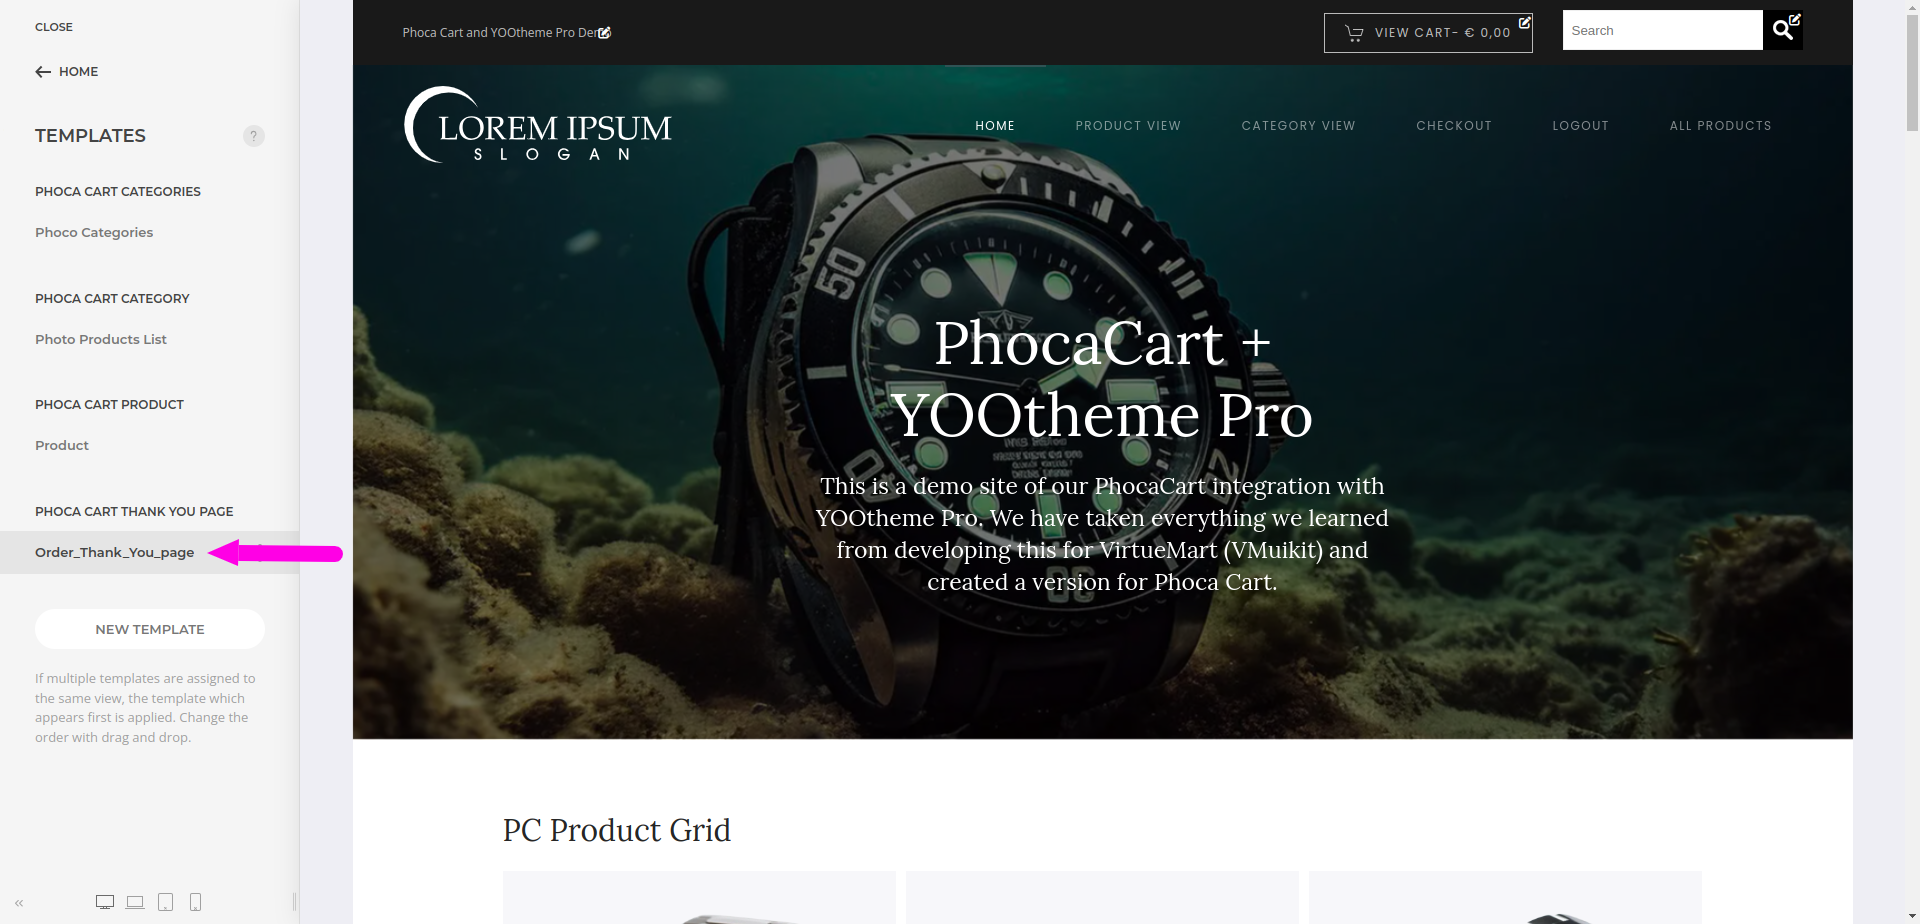
PC Order Thank You Page template :
- Open "YOOtheme" website builder inside the Joomla admin.
- Click "Templates" and then "New Template", give the name to the new template, then select "Phoca Cart Thank You Page" as "Page" type.
- Click "Save" to add the new template.

- From the listed templates, click on newly created "PHOCA CART THANK YOU PAGE" template.
- Here you build a new layout for Phoca Cart order thanks page using yootheme elements with phoca cart dynamic content sources.
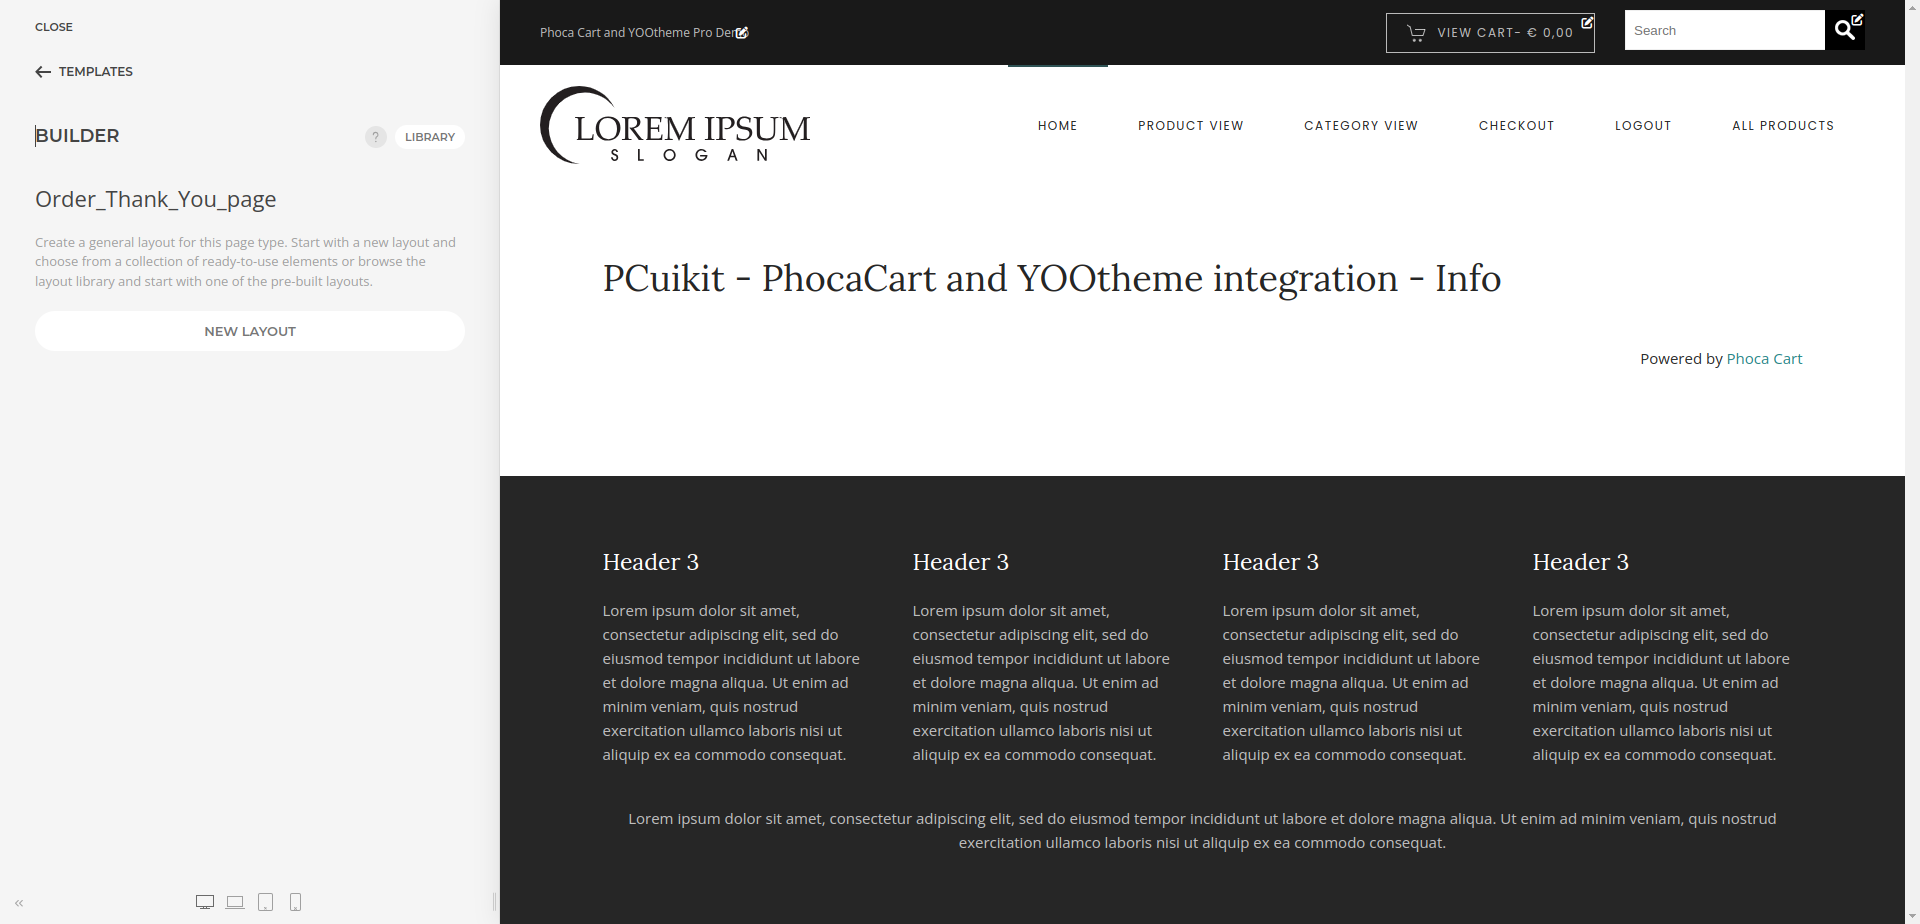
- Click "New Layout", add any element and then go to "Advanced" menu in the element.
- Select the option "PC Thank You Page" from "DYNAMIC CONTENT" dropdown list.
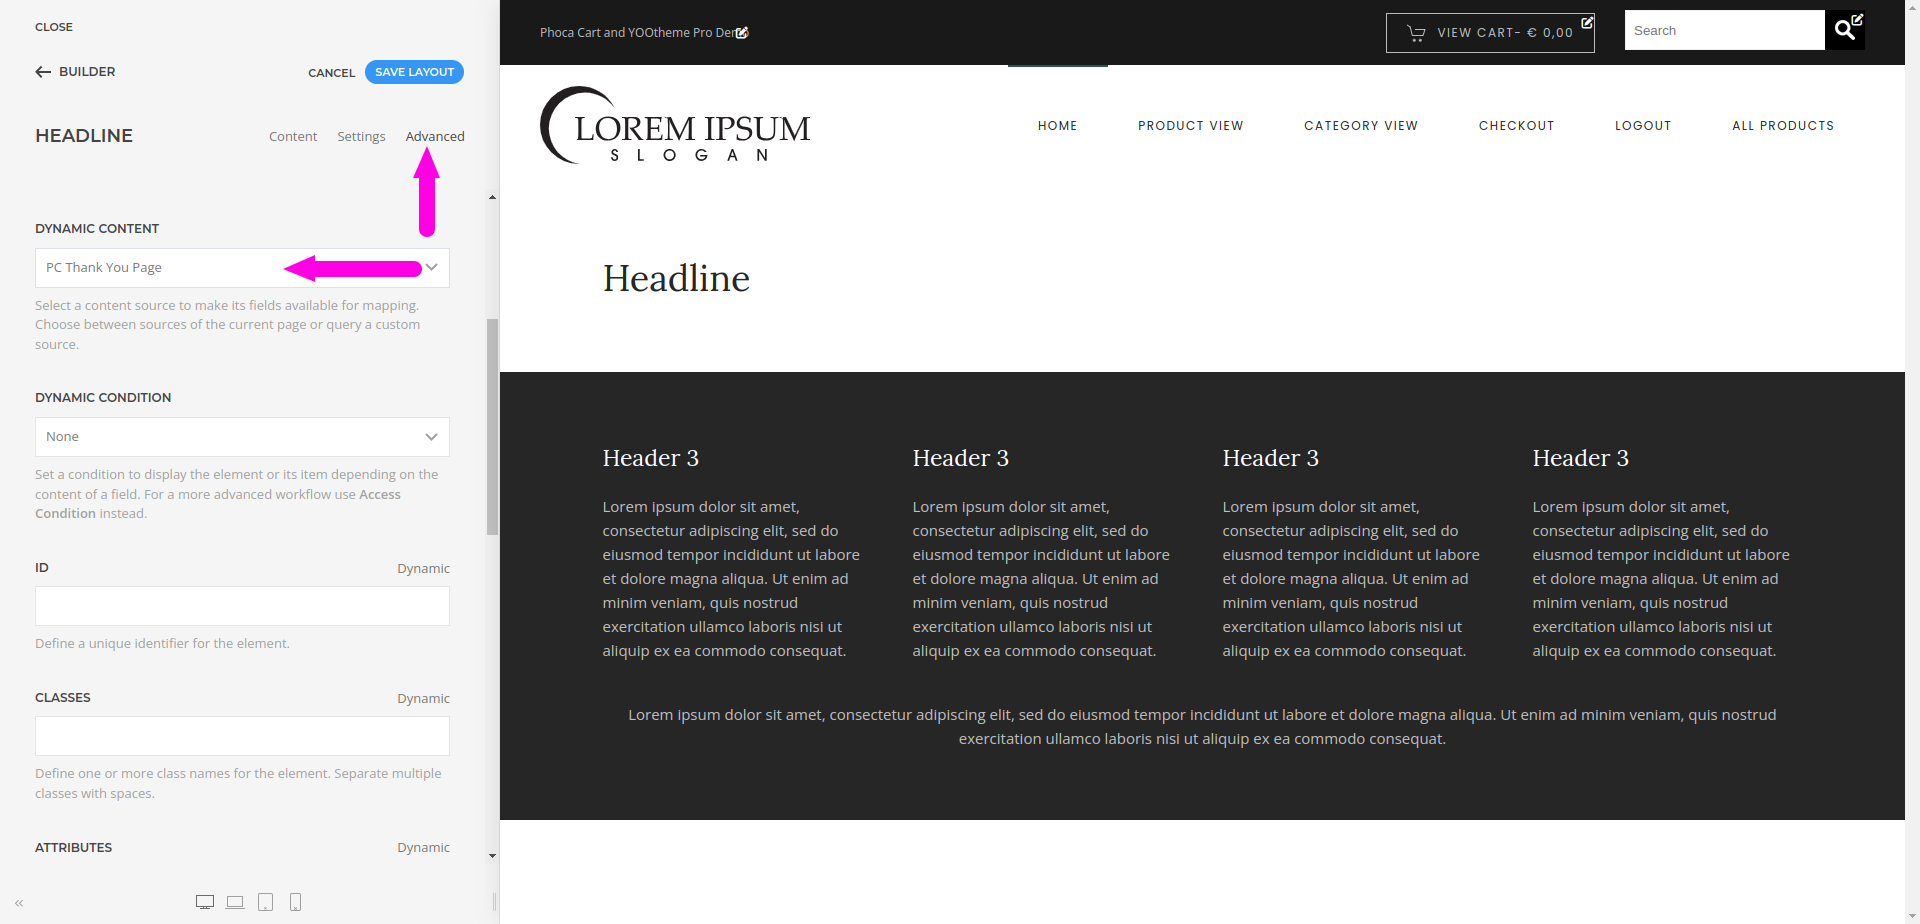
- Once a dynamic content source is selected, its fields are available for mapping.
- To map a content field to an element's field, open the Content tab of an element. Each element field shows a Dynamic button on the right which opens a dropdown with a list of all available content fields.
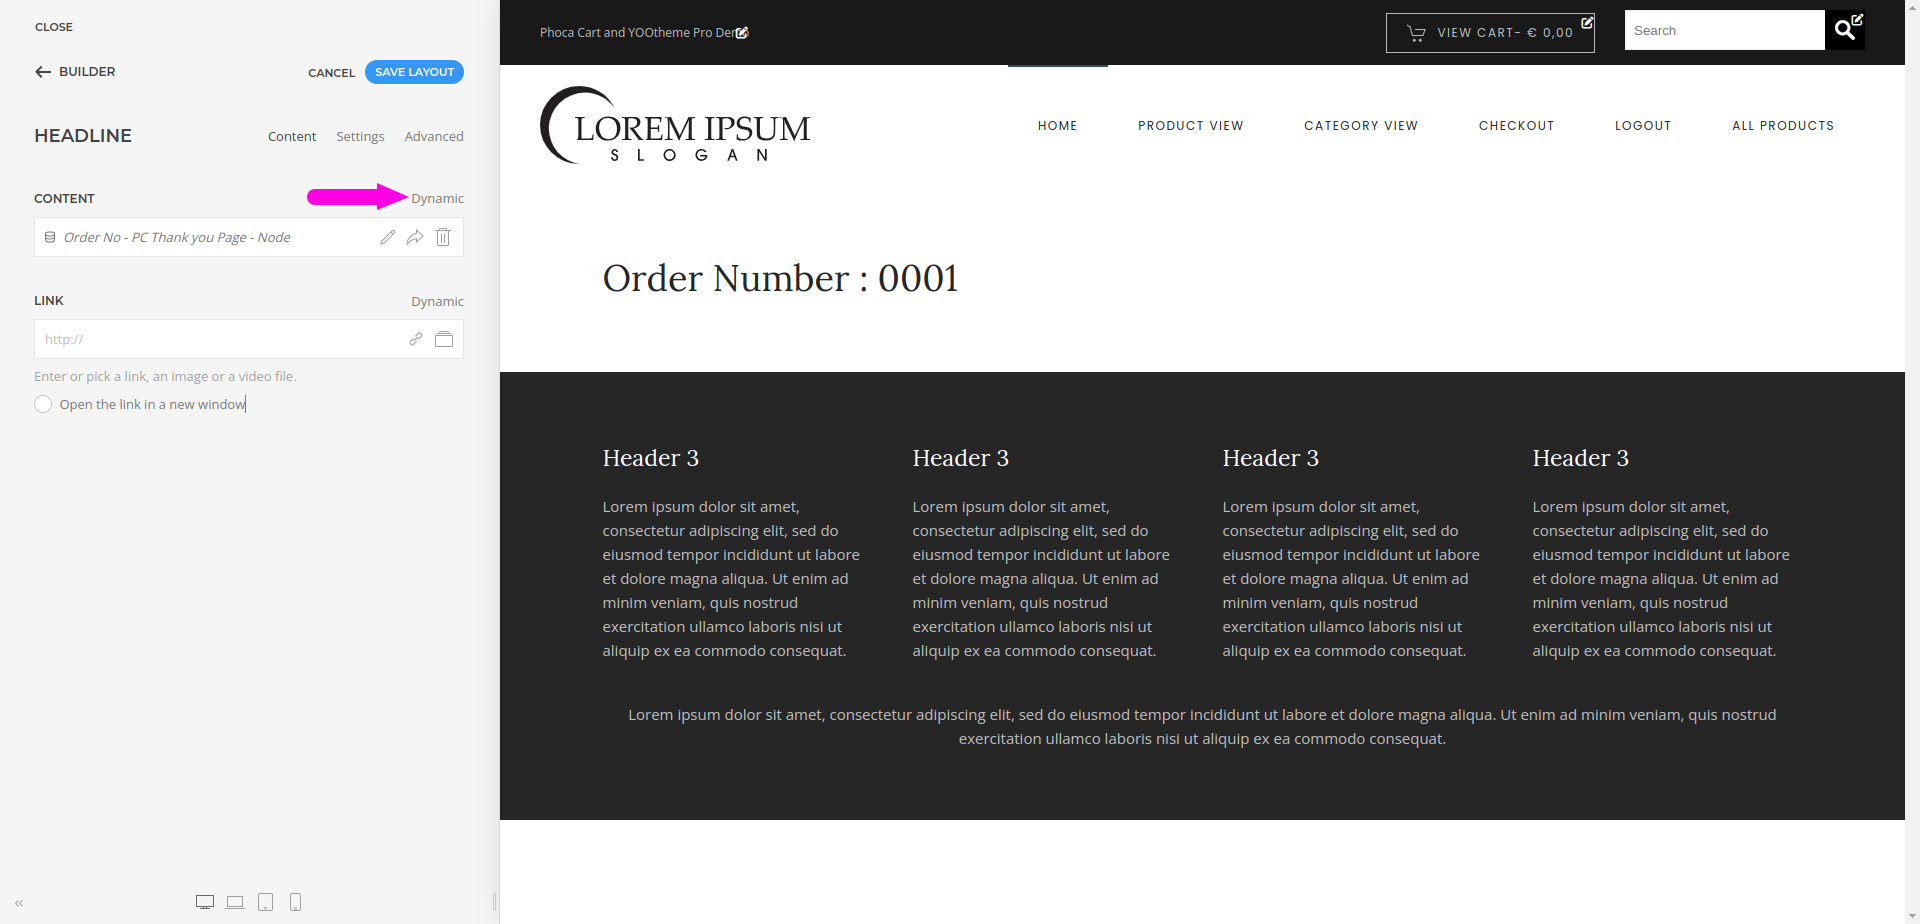
- You can create the PC thanks page layout using different content fields as per your requirements.